
Converting a chest freezer into the ultimate homebrew kegerator is easy. Besides, when you open the lid of a fully loaded keezer and reveal 5-6 (or more) gleaming stainless-steel kegs of your own beer, your friends will know you’re serious. Homebrew kegs are approximately 9 inches in diameter and 24 inches tall. Keep this in mind when you are shopping for a freezer, so you can estimate how many kegs you’ll be able to fit in a particular model. You may also want to determine if the CO2 tank will also be inside the keezer.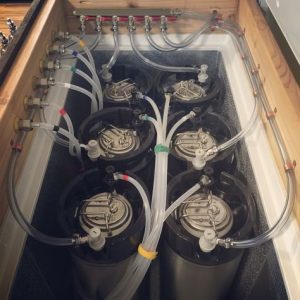
Once you have your freezer, a CO2 distributor manifold will be needed to supply CO2 to all the kegs. This is easy to add to any keg system with a CO2 regulator. A single body regulator can supply CO2 to all the kegs, but consider a double body model if you’d like to run two different serving pressures or force carbonate one keg while serving beer from the others.
Finally, a digital temperature controller, makes serving temperatures a breeze. It will also prevent the freezer from freezing your beer.
Or building a kegerator from fridge to have draft beer at home, also is much easier than it seems. You can save money compared to premade kegerators, moreover you can upgrade the critical components to better parts.
You’ll need to drill a couple holes for the shanks to pass through. The great benefit of this is that you do not need to spend the money for an expensive tower and the faucets are still at the correct height for easy pouring. Still, fridge, doesn’t take up much floor space, and the work is less than building a chest freezer collar. Open the door and line up where you want them to be. Choose a nice height for you to easily pour a beer. Slide the shanks through the holes and tighten down the nut, the more sturdy the shank the more sturdy your faucet will be. It’s a not wholly necessary upgrade. Attach your faucets to the shanks on the front.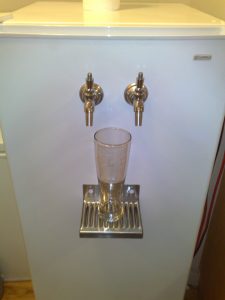
You have many options for tap handles, but it can be fun to collect some unique ones from the wild.
Attaching a drip tray is just a matter of drilling two screws into the door. Grab your tallest glass and use that to figure out how high you want to mount it. Then just center it and mark the spots for the screws. Then you can easily remove the drip tray for cleaning.
You need to build the beer lines. Use 3/16″ ID beverage grade tubing. Connect it to your faucets using a wignut, washer & nipple. Read up on the internet about how to balance a tap line. The http://www.homebrewing-equipment.com is a great place to start:-), click here. You can use barbed disconnects for the keg coupler, or the flared version so you can swap them out for perhaps a commercial keg coupler.
To control the temperature of your kegerator, you use an external thermostat. It plugs into the wall socket and the fridge into it. Then you secure the temperature probe inside the fridge and set the fridge for its coldest setting. Then the little control box on the outside can be used to set your desired serving temperature.
You will need to attach your regulator to the CO2 tank. All the lines and connections you build should be tested for leaks. Put them under pressure and use that to ensure you aren’t leaking.
The homebrew keg couplers are separated unlike commercial kegs. The black is the beer, and grey is for gas. Ball locks just pop on and off the keg. But we recommend always removing the keg from the kegerator before disconnecting in case a poppet gets stuck and a beer shower begins it’s easier to work with.
So find yourself a fridge, pick up a few tools and build yourself a kegerator.
The parts list is not extensive:
- Compact Refrigerator
- External Temperature Controller
- CO2 Cylinder
- CO2 Regulator (double body or with a splitter)
- 2 Kegs, or of course many more
- 2 Shanks (w. wing nut, washer & nipple)
- 2 Faucets & Tap Handles
- Gas and Beverage Lines (3/16″ ID for beverage)
- Gas & Beverage Keg Couplers (Quick Disconnects)
- Clamps
- Gas
- Drip Tray
Original post by: http://dieseldrafts.com
Leave a Reply
You must be logged in to post a comment.